![]()
Working with Images
eWebEdit400 makes it easy to insert images in to your content.
First, you import the image into library or as a Ektron CMS400.NET asset. Then, add it to the content. Next, you can edit its properties, such as border width and color, spacing, width and height, etc.
Inserting an Image
Prerequisite
Before you can insert an image into eWebEdit400, it must be either uploaded to the Library or imported as an asset.
Copying Files to the Library explains how to upload an image to the Library
Importing Managed Files explains how to import an asset
Procedure for Inserting an Image
To insert an image into the editor, follow these steps.
1. Place the cursor where you want the image to appear
2. Click Library ( ).
).
3. Make sure Images is selected in the content type dropdown.
4. From the folder display in the left panel, select the folder that contains the image you want to insert.
If you don’t know the image’s folder, use the search button ( ) to find the image by title, description, or internal file name.
5. Select the image you want to insert.
6. Click Insert ( ).
).
7. The image is inserted into the content.
Deleting an Image from Content
If you want to delete a picture, follow these steps.
1. Move the cursor over the picture.
2. Click the mouse to select the picture.
3. Click Cut ( ).
).
Note: If you want to remove an image from content created from an XML Smart Form and eWebEdit400 is your editor, click image ( ), open the Image Properties dialog, and delete the image path (circled below).
Inserting an Image Thumbnail
As an alternative to inserting an image, you can insert a thumbnail, a miniature version of the image. When the thumbnail appears on a Web page, a site visitor can click it to view a full-sized version of the image. See example below.
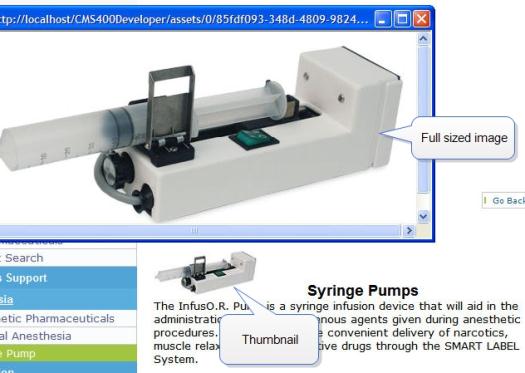
To insert an image thumbnail, follow the steps in Procedure for Inserting an Image, but when you get to Step 5, click the image’s thumbnail button ( ).
).
Note: You can change the thumbnail image by right clicking it, selecting Set Image Properties and editing the Image Src field. If you do that, however, and someone clicks it, the original full-sized image appears. If you want to change both the thumbnail and the full-sized image, delete it then enter a new thumbnail.
Editing an Image’s Properties
After an image in inserted, you can adjust the following properties for it.
border width
border color
alt text
description
alignment
the image itself
horizontal and vertical spacing
width and height
To access the Image Properties dialog, follow these steps.
1. Select the image.
2. Right click the mouse.
3. Click Set Image Properties.
The following explains the fields on the Image Properties dialog.
|
Field |
Description |
|
Border Width |
Set the width of the image’s border in pixels. See Also: Setting a Border |
|
Border Color |
To set the color of the image’s border, click the X circled below. When you do, a palette of colors appears. Click the border color from the palette.
If a color has already been assigned, it appears next to this field label. To change it, click down arrow next to the color to display the color palette. |
|
Image Alt Text |
The image’s title is used as the default alt text. Change if desired. The alt text appears in place of the image on the Web page if the image does not display. Examples of when an image does not display include: a speech browser (for example, a visually impaired person) a text-only browser (for example, browsing from a mobile phone) a graphical browser with images turned off |
|
Image Alignment |
The alignment of the image relative to adjacent text and images. If you choose left or right alignment, the text wraps around the image. For more information, see Aligning the Picture |
|
Image Src |
The path to the image. If you want to change the image, click the ellipsis ( |
|
Horizontal Spacing, Vertical Spacing |
The amount of horizontal and vertical space around the picture. See Also: Adding Space around the Picture |
|
Width |
The width of the picture in pixels. See Also: Pixels Note: The Width and Height settings determine the area on a Web page in which the image is displayed. To display an image correctly, its height and width settings should match its actual size (set using the resize button). See Also: Resizing the Image |
|
Height |
The height of the picture in pixels. See Also: Pixels |
|
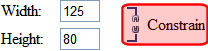
Constrain |
The constrain feature lets you determine if an image’s height and width can be adjusted independently. Typically, you want Constrain on, as shown below.
In this state, if one dimension is adjusted, the other is automatically adjusted in proportion to it. For example, if you change the height from 100 to 200, the width is also doubled. To turn Constrain off, click it. When you do, it looks like this.
When Constrain is off, the adjusted picture can be disproportionate, as shown below.
|
 ) button to open the library. From there, select a replacement image.

Warning! If you substantially adjust the picture’s height and/or width, the picture may be distorted when users view your Web page.
Pixels
A pixel is a single point in a graphic image.
Computer monitors display pictures by dividing the screen into thousands of pixels, arranged in rows and columns. The pixels are so close together that they appear connected.
Below is an image shown at regular size and then enlarged so you can see the pixels that make up the picture.
![]() regular size
regular size
![]() enlarged to show pixels
enlarged to show pixels
Setting a Border
To add a border around a picture, enter the border’s thickness in pixels in the Border Width field on the Image Properties dialog. See Also: Pixels
Here is a picture with a 1 pixel border.
![]()
Here is the same picture with a 10 pixel border.

If the picture is not a hyperlink, its border is black. If the picture is also a hyperlink, the border is the same color as a hyperlink (for example, blue or purple if visited).
Aligning the Picture
To align a picture, use the Image Alignment field on the Image Properties dialog.
The following table lists your alignment choices.
|
To align |
Click this Alignment option |
Illustration |
|
The picture on the left margin, allowing subsequent text to wrap around it |
|
|
|
The picture on the right margin, allowing subsequent text to wrap around it |
|
|
|
The top of the picture with the first line of text |
|
|
|
The vertical center of the picture with the first line of text |
|
|
|
The bottom of the picture with the first line of text |
|
|


Adding Space around the Picture
On the Image Properties dialog box, you can use the Spacing fields (Horizontal and Vertical) to add space around the picture. You enter a number of pixels to determine spacing value.
The following graphic illustrates the effect of adding spacing to a picture.
Editing an Image
You can perform the following tasks on any image inserted into eWebEdit400 content.
crop
resize
rotate
adjust brightness
To access the image editing tool, edit a piece of eWebEdit400 content, right click an image, then click Image Modification Tool.
When you do, the following dialog appears.
Note: When you save an image, a version is placed in the site root/uploaded images/CMS folder folder. The version is named filename.nextnumber.file extension.
For example, if a library image is named ektronlogo.png, and someone inserts it into content and saves it, a new version is created and named ektronlogo.1.png. If someone later saves that image in another content block (or even another section of the same content), that version is named ektronlogo.2.png. Also, whenever someone edits and saves the image, a new version is created and assigned the next highest number.
These edits have no effect on the original image stored in the library.
The following table explains the toolbar buttons. After changing the image, click the Save button ( ) to finalize changes.
|
Button |
Description |
For more information, see |
|
|
Save changes |
Note above |
|
|
Exit without saving changes |
|
|
|
Crop image (that is, remove a portion of it). Drag the box around the area you want to keep and click Done. |
|
|
|
Change image size |
|
|
|
Rotate image |
|
|
|
Adjust brightness |
Note: If you begin editing an image then click cancel ( ), and later try to edit that image, you may see a small, red x instead of the image. (This problem only occurs if your browser is Internet Explorer.) To remedy the problem, go to Tools > Internet Options > Browsing History > Settings (or Temporary Files > Settings in Internet Explorer 6). Set Check for newer versions of stored pages to Every Visit.
Resizing the Image
To change an image’s size, click Resize ( ). When you do, the following dialog appears.
Change the image to the desired size then click Done.
Keeping the Aspect Ratio
Aspect ratio is the relationship between an image’s width and height. For example, if a graphic has an aspect ratio of 2:1, its width is twice as large as its height.
If you check the Keep Ratio box, just specify a new width or height - the other dimension is calculated for you.
Effect of Changing Image Size on the Image Properties Dialog
The Width and Height settings on the Image Properties dialog (shown below) determine the area on a Web page in which the image is displayed.
To display an image correctly, its height and width on this dialog should match its actual size (that you set using the Resize button).
Adjusting Brightness
To adjust the image’s brightness, click Brightness ( ). When you do, a brightness control appears.
The red dot indicates the current brightness level.
To brighten the image, place your cursor to the left of the red dot and click.
To darken it, move the cursor to the right of the red dot and click.
When you click, the image redisplays using the new brightness level. When you are satisfied, click Done.
Rotating an Image
To rotate an image, click Rotate Image ( ). When you do, image rotation buttons appear.
Use the buttons to rotate the image clockwise or counterclockwise in ninety degree increments. When you are satisfied, click Done.
Cropping an Image
Cropping an image removes the portion of the image that is not within the cropping tool. To crop an image, click Crop Image ( ). When you do, the crop image box appears.
Drag the crop tool’s handles to frame how the image is cropped. When you are satisfied, click Done. Everything outside the crop box is removed.


![]()